You can use API Management (APIM) to manage Event API Products created in Event Portal. To get started, review this page to familiarize yourself with the concepts and requirements to use the APIM/DevPortal.
API Concepts
The API has two core concepts:
- Event API Products package one or more event APIs and associate them with endpoints (gateway event brokers). They also provide plans that configure policies such as event retention.
- Application Registrations represent a developer application. When a developer requests access, for example, by attempting to subscribe to an Event API Product, an access request must be associated with the Application Registration.
The following diagram illustrates the object model and the core entities:
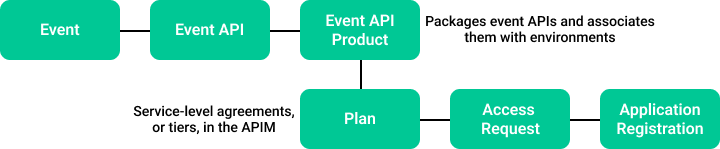
Event API Products are managed and maintained using Event Portal. Application Registrations are created and managed by the API client - for example, a developer portal or API Marketplace where a developer registers their API access requests.
Event Portal Prerequisites
To make Event API Products available, you must complete some steps in the Event Portal Runtime Event Manager and Designer tools:
- Configure Solace event brokers in Runtime Event Manager to use Event API Products.
- Make Event API Products "publicly available" so they are visible in the API.
Configure Solace Event Brokers in Runtime Event Manager
This section highlights the relevant actions required for the API. For more information, see the Runtime Event Manager product documentation.
You must have a suitable event broker set up in a modeled event mesh to associate Event API Products with an environment and the event broker:
- Create a new modeled event mesh or use an existing one. The modeled event mesh must be in an environment that has Runtime Configuration enabled.
- Navigate to the modeled event mesh and select the Event Broker Connections tab.
- If the intended event broker is not listed, add an event broker to the modeled event mesh.
- Verify or add the event broker configuration details.
Create or Use an Existing Modeled Event Mesh
See the product documentation for more information.
Verify that Runtime Configuration is Enabled for the Environment
For more information about enabling runtime configuration, see Environments.
Navigate to the Modeled Event Mesh and Select the Event Broker Connections Tab
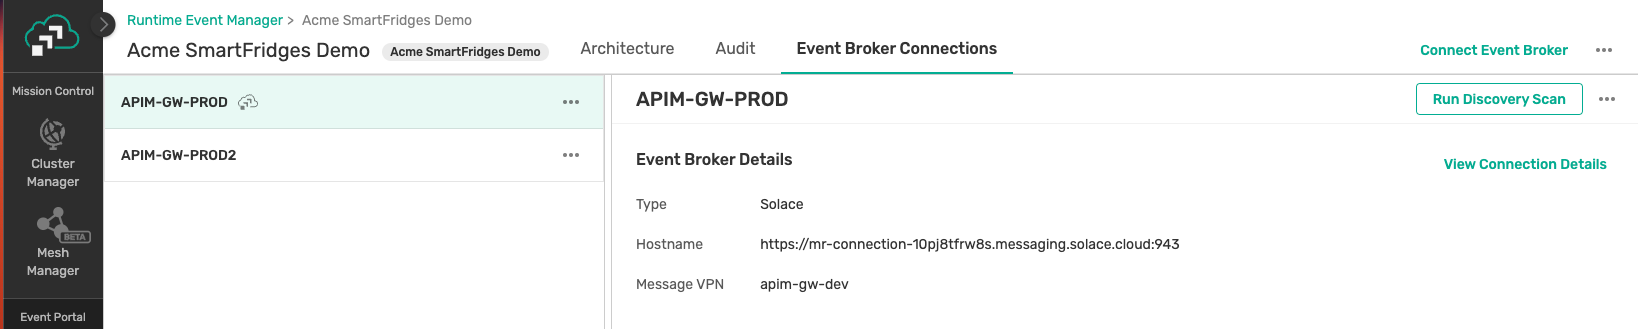
Connect an Event Broker
If the intended event broker is not listed, see Adding an Event Broker to a Modeled Event Mesh.
Verify the Event Broker Configuration
If the intended event broker is already in the modeled event mesh, select the event broker and click View Connection Details. Verify all connection details for the event broker on the Management and Messaging tabs.
For more information about setting event broker configuration details, see Managing Model Event Brokers.
The Management settings must be fully provided. For Solace event brokers that are not managed in Solace Cloud, you need to provide an appropriate password to the API. For more information, see Configuring Event Broker Secrets.
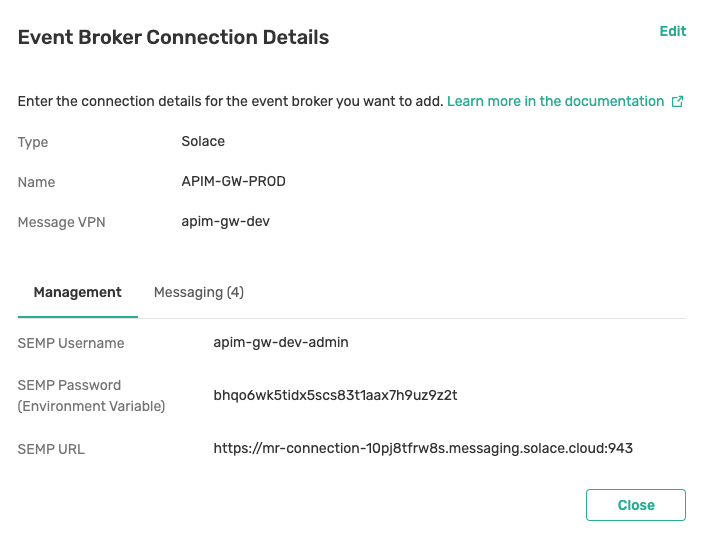
On the Messaging tab, set the Host Name and add all the protocols that you want to expose in Event API Products.

Make Event API Products Publicly Available
Only publicly available Event API Products are visible in the API. For more information, see Event API Products.
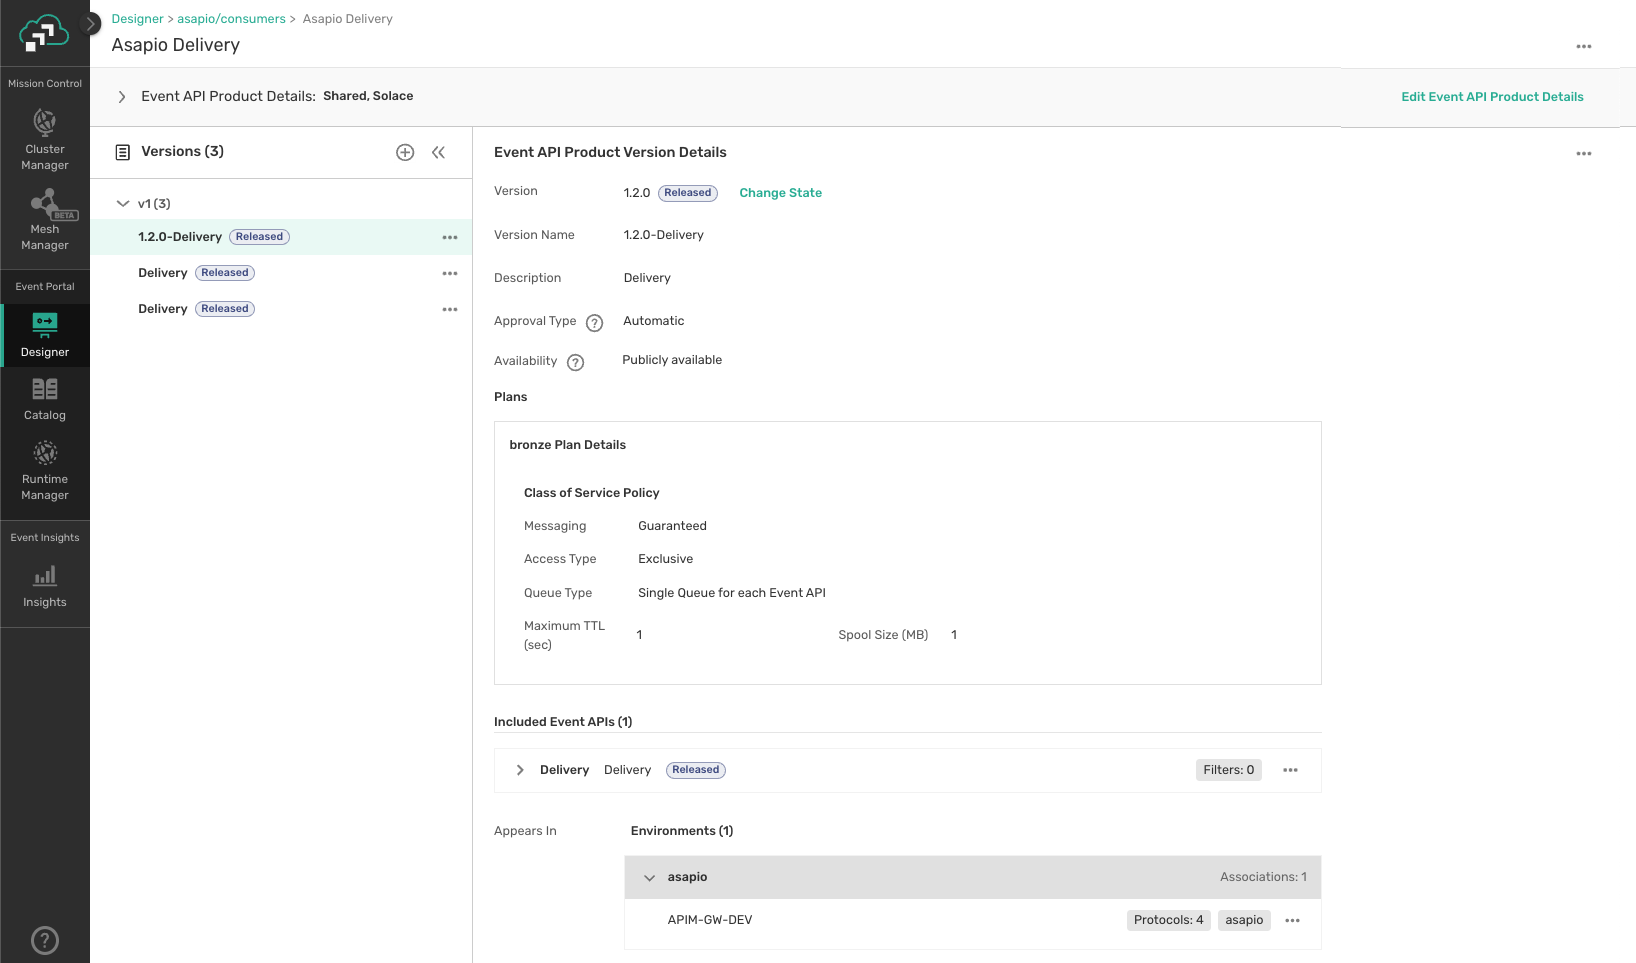
The following conditions must apply (see the illustration below):
- The Event API Product must be "shared".
- The version must be in Released state.
- An environment and event broker must be associated with the version.
- At least one plan must be defined.
- The version must be marked as "publicly available".
Verify the Model Event Broker is Connected to a Runtime Event Broker
Each event broker in a modeled event mesh represents an operational event broker in your runtime. To enable runtime configuration, each model event broker must have a connection to an operational event broker. How you enable the connection depends on the event broker. For more information, see Enabling Event Broker Connections.
Prepare Runtime Event Brokers for API Management
This API requires the presence of a set of predefined client profiles on each event broker that is associated with Event API Products - see details. We provide a terraform dSEMP project that sets up this pool of client profiles on a target event broker, see our product documentation for more information on Declarative SEMP (dSEMP).
Prerequisites
You need a Terraform CLI Client - see Dependencies in our dSEMP product documentation.
Obtain Event Broker Connection Details
Collect all necessary information to connect to your event broker with credentials that allow you to create client profiles, such as the “Mission Control Manager“ credentials for a cloud event broker service.
You need:
url: Base SEMPv2 URL, for example,https://my-host:8443for a self-hosted event broker orhttps://mr-connection-123lkse5abcd.messaging.solace.cloud:943for a cloud event broker service.username: Username with administrative privileges on the target event broker, for example,admin.password: Password with administrative privileges on the target event brokermsg_vpn_name: Message VPN Name, for example, default
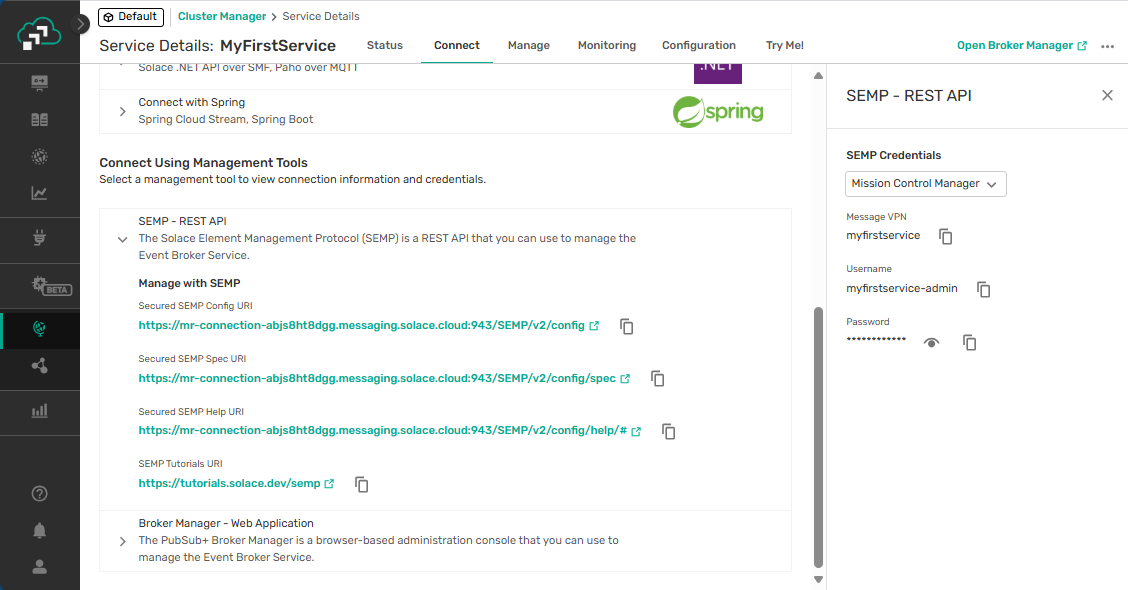
To find the required information for the event broker service:
- In the Cloud Console, navigate to Cluster Manager, then select your event broker service.
- Select the Connect tab.
- Expand the SEMP - REST API section.
Clone the GitHub Project and Configure Environment Variables
Clone the GitHub project: GitHub - terraform-solacebroker-apim-clientprofiles for creating required client profiles for APIM support.
git clone [email protected]:solace-iot-team/terraform-solacebroker-apim-clientprofiles.git
Alternatively, download the code as a ZIP and unpack it on your local drive.
Next, configure your environment variables. Create a file named terraform.tfvars in the cloned repo’s root directory (where main.tf is located) with the following contents. Use the connection information you obtained from the event broker:
- url = "https://mr-connection-123lkse5abcd.messaging.solace.cloud:943"
- username = "admin"
- password = "secret"
- msg_vpn_name = "default"
Open a shell and switch to the Terraform project’s root directory. Then initialize the project:
terraform init
Apply the Configuration
Open a shell and switch to the Terraform project’s root directory. First plan, then apply the configuration:
terraform plan
Failure of the plan stage typically indicates that you have provided incorrect connection details or credentials for a user with insufficient privileges.
terraform apply
Verify the Client Profiles are Present on the Event Broker
In Solace Broker Manager, verify the client profiles were created on the Message VPN.
For event broker services, view the service in Cluster Manager and click Open Broker Manager.
Select Access Control on the navigation bar, and then select the Client Profiles tab. The profile names start with the prefix APIM.
Interacting with the API
Now you can interact with the API:
- API authentication
- Obtain available Event API Products
- Continue a simple end-to-end walkthrough
- Filter Event API Products
- Filter Event API Products on custom attributes
API Authentication
To use the API Management, you require an API token that you generate in the Solace Cloud Console. For more information about creating and managing API tokens, see Authentication.
The user account that you are using to create the API token must have the following roles:
Event Portal Managerfor full access to Event PortalMission Control Managerfor full access to Mission Control
If your user account does not have the required roles, contact an administrator for your account in Solace Cloud to get the appropriate roles assigned. Alternatively, you can have another user with the required roles to create an API token for you. To create an API token, see Steps for Creating an API Token.
The API token you create must have at least the following permissions as shown in the following table.
| Location on the API Token Management Page | Permissions | API Token Permission |
|---|---|---|
| Mission Control > My Service | Allow access to Mission Control | mission_control:access
|
| Get My Services with Management Credentials | services:get:self
|
|
| Mission Control > Organization Services | Create / Update / Delete Client Profiles | service_requests:post:client_profile
|
| Get Services with Management Credentials | services:get
|
|
| Event Portal > Designer | Read any Application | application:get:*
|
| Read any Application Domain | application_domain:get:*
|
|
| Access to Event Portal Designer | event_designer:access
|
|
| Event Portal > Runtime Event Manager | Get Application Configuration Push Job | application_configuration_push_job:get:*
|
| Get Environment in Event Portal | ep_environment:get:*
|
|
| Get Event Broker in Event Portal | modeled_event_broker:get:*
|
|
| Get Modeled Event Mesh in Event Portal | modeled_event_mesh:get:*
|
|
| Event Portal > API Management/DevPortal | Create, update, or delete published event API products and their underlying resources | apim_event_api_product:*:*
|
| Get published event API products and their underlying resources | apim_event_api_product:get:*
|
Get Event API Products
Let's look at the first API call and explore the main elements of an Event API Product.
- You must provide a valid API token in the HTTP Authorization header.
- The call returns a list of Event API Products that are publicly available in the Event Portal account associated with the provided API token.
Theidproperty of the object can be used to retrieve a detail view and to call sub-resources of Event API Products, such as plans or attributes. - Plans are embedded in the Event API Product response. Plans represent the service-level agreements (SLAs) or tiers offered for subscriptions created by developers.
- The APIs array contains the Event APIs that are part of the Event API Product.
curl --request GET \
     --url https://apim-devportal-api.solace-labs.io/api/v2/apim/eventApiProducts \
     --header 'accept: application/json' \
     --header 'authorization: Bearer <<user>>'
{
    "data": [
        {
            "plans": [
                {
                    "id": "8a0g3o0prdf",
                    "name": "silver",
                    "solaceClassOfServicePolicy": {
                        "id": "x1c1zh539xg",
                        "messageDeliveryMode": "guaranteed",
                        "accessType": "exclusive",
                        "maximumTimeToLive": 1,
                        "queueType": "single",
                        "maxMsgSpoolUsage": 1
                    }
                },
                {
                    "id": "lsw67j8cy26",
                    "name": "bronze",
                    "solaceClassOfServicePolicy": {
                        "id": "t9vhjuizng4",
                        "messageDeliveryMode": "guaranteed",
                        "accessType": "exclusive",
                        "maximumTimeToLive": 1,
                        "queueType": "single",
                        "maxMsgSpoolUsage": 1
                    }
                }
            ],
            "apis": [
                {
                    "id": "29591g18w8q",
                    "version": "1.0.0",
                    "description": "BUS1006",
                    "displayName": "BUS1006",
                    "name": "BUS1006",
                    "customAttributes": []
                }
            ],
            "apiParameters": [
                {
                    "name": "REFERENCE",
                    "dataType": "string",
                    "parameterType": "unbounded"
                }
            ],
            "createdTime": 1693576372483,
            "updatedTime": 1693576420187,
            "createdBy": "3e2ocmx105",
            "changedBy": "3e2ocmx105",
            "id": "kils37cwlkz",
            "name": "Asapio BUS1006",
            "applicationDomainId": "bpgli1jzier",
            "applicationDomainName": "asapio/consumers",
            "approvalType": "automatic",
            "brokerType": "solace",
            "description": "BUS1006 - new version",
            "version": "1.7.0",
            "displayName": "1.7.0-BUS1006",
            "state": "RELEASED",
            "solaceMessagingServices": [
                {
                    "solaceCloudMessagingServiceId": "dr6uq5q8gjj",
                    "id": "f5ug1291p2g",
                    "messagingServiceId": "wgex5k3ov3h",
                    "messagingServiceName": "APIM-GW-DEV",
                    "supportedProtocols": [
                        "smfc",
                        "smf",
                        "smfs",
                        "amqp",
                        "amqps",
                        "mqtt",
                        "secure-mqtt",
                        "mqttws",
                        "secure-mqttws",
                        "http",
                        "https"
                    ],
                    "environmentName": "asapio",
                    "eventMeshName": "asapio"
                }
            ],
            "customAttributes": [
                {
                    "name": "PUBLISH_DESTINATIONS",
                    "value": "ep-developer-portal"
                }
            ],
            "attributes": []
        }
    ],
    "meta": {
        "pagination": {
            "pageNumber": 1,
            "nextPage": null,
            "totalPages": 1,
            "count": 1,
            "pageSize": 20
        }
    }
}