You require Bearer authentication and an API token to use the REST APIs for Solace Cloud. You can create an API Token and use it for sample calls in this API reference.
Understanding Authentication When Using the REST API
Solace Cloud uses Bearer authentication. Bearer Authentication requires that you include an API token in the Authorization header with each REST API call. You can generate an API token in the Solace Cloud Console. All users can create API tokens. The permissions you can see and can assign to an API token are limited to the permissions available to your assigned user role in the account (or organization).
For example, if your user profile in the account has the Mission Control Manager role, you have read and write access to create, delete, and update event broker services in Mission Control. When you create an API token, you can assign a subset of permissions. For example, you may want to create an API token that allows access to create event broker services (Create Services permission) but not allow updating or deleting event broker services, in order to restrict the functionality an application is permitted. Conversely, if your user profile has the Mission Control Viewer role, you can't create an API token with the Create Services permission because your role doesn't have that permission.
If you have a user role, such as Mission Control User or Event Portal User, that can have elevated permissions for specific environments, application domains, or event broker services, tokens you create in the Cloud Console don't have elevated permissions for those resources. For example, if you have the Event Portal User role, tokens you create in the Cloud Console do not allow you to get application domain data, even if you have been given Manager level access to one or more application domains. If you want to create a token that does have elevated permissions to specific resources, you can create a token that allows the Create an API token endpoint to generate additional tokens with your resource permissions. In this case, if you have the Event Portal User role, tokens you create using the Create an API token endpoint allow you to get application domain data for application domains that you have Viewer or Manager level access for. Using the token to call the Get a list of the application domains endpoint, returns a list of the application domains you have access to.
The permissions for an API token have a higher degree of granularity than the permissions assigned to a user role. You can choose to enable or disable permissions based on the REST APIs that are used by your application. The permissions enabled in a token allow applications to perform different actions. We recommend that you create an API token that has the minimum number of permissions required for the application using the API token to function. When you limit the permissions, it ensures that an application can perform only the actions they are allowed and access only the required data they are permitted.
When you use API tokens, be aware:
- you can create up to 50 API tokens per user in the Solace Cloud Console
- the secret for an API token cannot be viewed - if you lose it, you must regenerate the API token
- if you lose the permissions in your user account that were previously assigned to an API token when you had the permissions, the API token is deleted
- you are authenticated to call endpoints in the account (organization) where the API token was created and all calls run in the context of that account
Creating API Tokens
You can select a granular set of permissions for each API token. You are limited to setting only the permissions that are assigned to your user role. The granularity of the permissions allows you to create an API token scoped to perform specific operations. You can set multiple permissions based on your use case or requirements, but we recommend that you enable the minimum number of permissions in the API token and abide by the principle of least privileges. After you create an API token, you cannot modify the token permissions.
The permissions that you enable for an API token allow you to perform specific REST API operations in Solace Cloud. To determine the permissions that a REST endpoint requires, you can either:
- Find the required permissions based on the API reference
- Find the required permissions based on the endpoint URLs
If you want to create a token that allows you to use the Create an API token endpoint to generate additional tokens, the token you generate in the Cloud Console requires only the Create an API token permission. You specify the permissions your API-generated token needs in the Create an API token endpoint.
After you determine the permissions that you require, you can create your API token.
Finding the Required Permissions Based on the API Reference
You can determine the required permissions by referring to the API documentation for the endpoints you want to use (if it's available) and then enabling the permission when you create your API token.
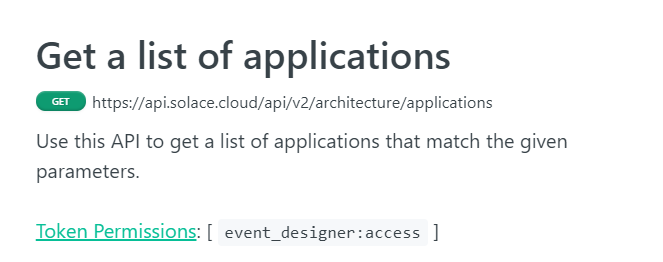
For example, for the Get a list of applications endpoint, the permission listed is event_designer:access in the API reference in the heading Token Permissions as shown below:
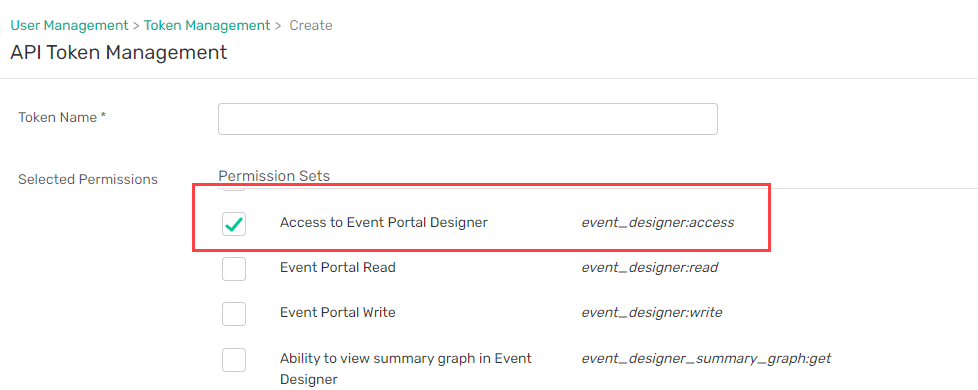
Continuing with our example, if you wanted to create an API token that allows you to perform the GET operation to the https://api.solace.cloud/api/v2/architecture/applications endpoint, you would search on the Create Token page for event_designer:access and find that the permission corresponds to the Access to Event Portal Designer permission. After you select the Access to Event Portal Designer permission and click Create Token , you have an API token that allows an application to perform the GET operation to the https://api.solace.cloud/api/v2/architecture/applications endpoint.
Finding the Required Permissions Based on the Endpoint URLs
You can search for the endpoint URL on the API Token Management page to determine the required permission when you create your API token. Note that this is a legacy way of determining the permissions as most of the endpoints have the required API token permissions documented in the API reference.
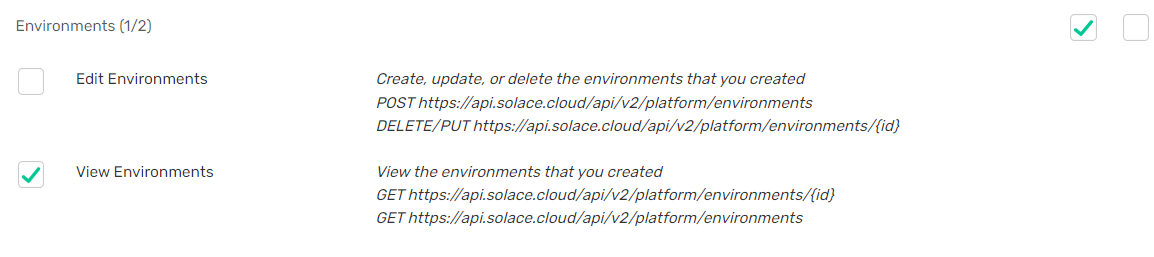
For example, if you wanted to create an API token that only permits an application to issue a GET operation to the https://api.solace.cloud/api/v2/platform/environments endpoint, you would search on the Create Token page for the URL and find that corresponds to the View Environment permission. If you select the View Environments permission and click Create Token , you have an API token that allows an application to perform the GET operation to thehttps://api.solace.cloud/api/v2/platform/environments endpoint:
Steps to Create an API Token
To create an API token, perform these steps:
- Log in to the Solace Cloud Console if you have not done so yet. The URL to access the Cloud Console differs based on your authentication scheme. For more information, see Login URLs for the Solace Cloud Console.
- Ensure you have the correct account selected if you belong to multiple accounts.
- On the navigation bar, click User & Account
 , and then select Token Management.
 - Click Create Token.
- Enter a Token Name.
- In the Selected Permissions section, select the permissions that you want to enable. You can select read and write permissions for a category, and enable or disable individual permissions. We recommend that you enable only the minimum number of permissions required to use the REST endpoints for your application. For more information about determining the permissions to choose, see Finding permission based on the listed API token permission and Finding the permission based on the endpoint
- Click Create Token.
- Click Copy to copy the token to your clipboard.
Note: For security reasons, this dialog doesn't appear again. If you lose the token you must regenerate the API token or create another token. - Click Close.
- To use the token, put the value that you copied in the following REST header for any calls to your account:
Authorization: Bearer <Your New API Token>
You can use this reference to try the APIs.
Using the API Token in This Reference
After you create your API token, you can use it to generate a code snippet, generate a curl command, and even use Try It to issue the command directly from the Solace Cloud REST API Reference. Ensure that you have an API token with the permissions for the call you want to create before you follow these steps:
- On the Solace Cloud REST API reference page, select an API call that you want to use.
Note
The calls that you can use with your account depend on the products and roles assigned to your user profile.
- On the right pane beneath Authentication, paste your API token in the Bearer field. You can choose the code to generate and the default is a Shell. You can select any language to generate an example under Language. You can select from more languages if you click the kebab icon on the right.

- (Optional) Click the Base URL drop-down menu to select the Base URL to use. For more information, see Specifying the Correct Base URL for REST API Endpoints.
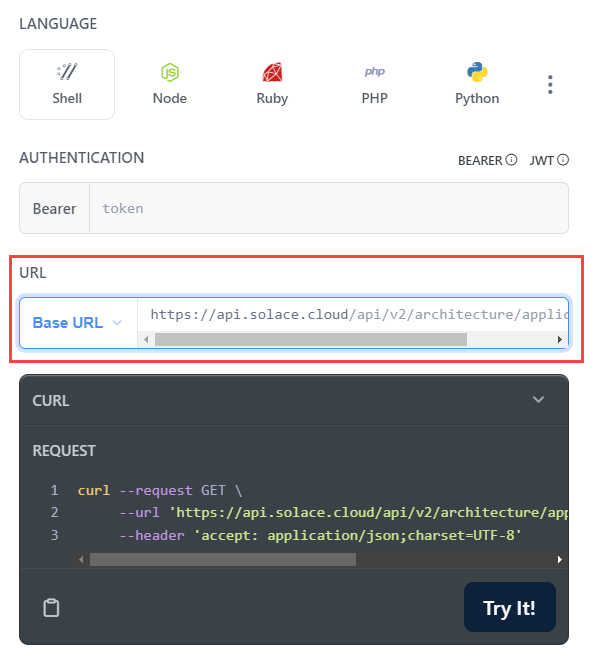
- To try the command, perform one of the following actions:
- click Try It
- for Shell commands, copy the
curlcommand and run it in a CLI - copy the specific code and run it in your application.
After you run the command, check the HTTP response code to determine if it was successful. If it was not, troubleshoot using the HTTP response code and error code.
Regenerating an API Token
You cannot retrieve lost API tokens, but you can regenerate them. Regenerating a token creates a new token with the same permissions. If you regenerate an API token, you must update all applications and scripts that use the token to allow them to continue accessing the REST API for Solace Cloud.
To regenerate an API token, perform these steps:
- Log in to the Solace Cloud Console if you have not done so yet. The URL to access the Cloud Console differs based on your authentication scheme. For more information, see Login URLs for the Solace Cloud Console.
- On the navigation bar, click User & Account, and then select Token Management.
- Click More Actions
 for the token that you want to delete and select Regenerate Token.
 - Click Regenerate.
- Click the Copy button to copy the token to your clipboard.
- Click Close.
The API token should be on your clipboard. You can paste it into your application code for use with the REST API.
Deleting an API Token
It's a good security practice to remove outdated API tokens and ones that you no longer use. You cannot restore an API token after you delete it, and applications can no longer use that API token to make API calls.
To delete a token, perform these steps:
- On the navigation bar, click User & Account, and then select Token Management.
- Click More Actions for the token that you want to delete and select Delete Token.